Customizing the Database > Time Entry export format > Field mapping and details
 Field mapping and details
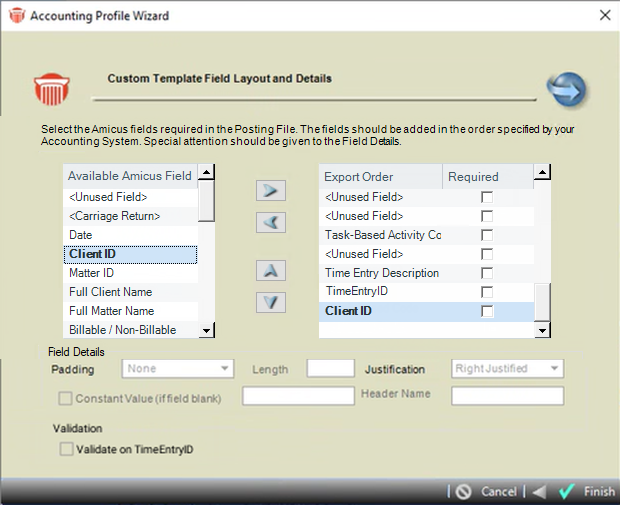
In the Custom Template Field Layout and Details dialog of the wizard, specify the mapping of the Amicus fields to export fields, and the attributes of each export field.
-
For each desired export field, select an Amicus field in the Available Amicus Fields list and click the > button to copy it into the Export Order list.
-
If you want to create a constant value or blank field that is not based on any Amicus fields, add "<Unused Field>" to the Export Order list where required.
-
If you want to insert a carriage return, add "<Carriage Return>" to the Export Order list where required.
-
If Batch Bosting was selected in the Posting File Options window a TimeEntryId field displays that can be added to the Export text file and a Validation section.
-
Select the Validate on TimeEntryID checkbox to ensure that unexpected entries are not present in the exported text file.
-
At the interval preset in the Posting File Name and Location dialog, any Time Entries "Marked for Posting" will be written to the Export text file. If a Time Export text file already exists, the Time Entries will be appended to it.
-
Time Entries that have already been "Marked for Posting" cannot be posted again. If the Time Entry is "Unposted", then its "Marked for Posting" date should be cleared.
-
-
-
Use the up and down arrow buttons to adjust the sequence of fields in the Export Order list to fit the requirements of your accounting system.
 |
Tip: If using the Tabs3 template provided with Amicus, and you do not want the Amicus rates exported, replace the rate field with an in the same position. |
For each field in the Export Order list, select or clear the Required checkbox at the right. If a user tries to post a Time Entry lacking a required field, Amicus Attorney will warn them.
For each field in the Export Order list, use the bottom section of the dialog to specify the export field details:
-
Padding—If exporting a Fixed Width file, specify how to pad the justified data within the export field: with spaces, zeros, etc. You can select a character or enter one.
-
Length—If exporting a Fixed Width file, enter the length of the export field. If the Amicus data is too long to fit, it will be truncated.
-
Justification—If exporting a Fixed Width file, specify whether to right or left justify the Amicus data within the export field.
-
Billable Notation, Non-Billable Notation—If the Amicus field is Billable/Non-Billable, enter the characters you want used to represent this status (e.g. "B" and "NB").
-
Constant Value—Enter the value to be exported if the Amicus field is blank. Leave this box blank if you do not want any value exported.
-
Header Name—If exporting a header as the first row (an option in the Time Entry Export Format dialog), enter the text to be exported as the header for each export field. For example, you could export "Narrative" as the name for the Description field.
Then click Finish. You have completed the Accounting Profile.
Testing your export format
We recommend that you test the effect of your settings on the Amicus Attorney displays and the posting file (with your accounting system), before "going live".
Related Topics
