APX (Abacus Payment Exchange) > Managing a Pay Now Request
 Managing a Pay Now Request

Learn by Video – Pay Now
Firm members can now easily include a Pay Now link with emailed invoices that allows the client to easily pay their bill by credit card.
Pay Now emails include an embedded URL that clients can click and easily make an APX payment. They are generated from the Finalize Bill screen during the Create Bill process or from the Billing module after the bill is created.
 |
Important: To send a Pay Now request from the Billing module, the firm must have APX enabled on the general bank account. |
This topic covers:
To send an email with a Pay Now request
-
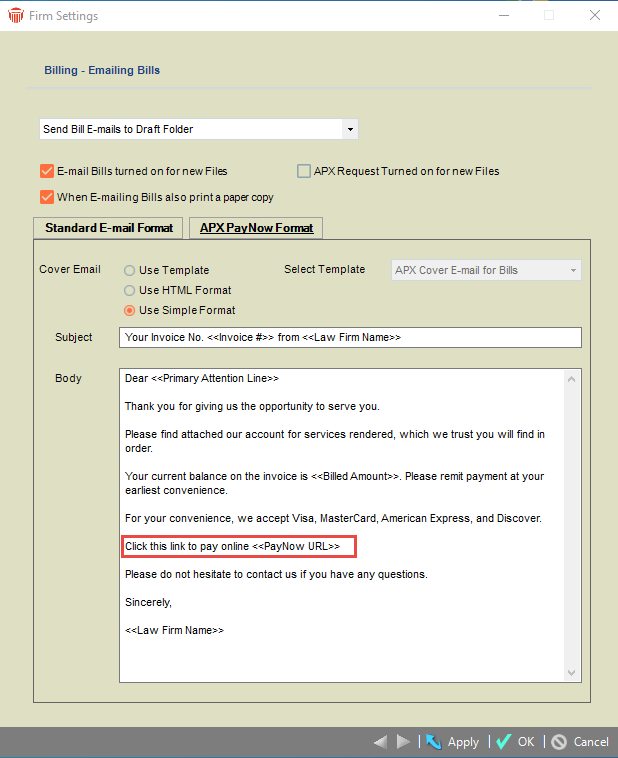
Go to Firm Settings and select Emailing Bills under the Billing section to display the Billing - Emailing Bills dialog.
-
Click on the APX PayNow Format tab.
-
Select one of the following radio buttons from the Cover Email field.
-
Use Template
-
Use HTML Format
-
Use Simple Format
-
-
Click on the dropdown arrow in the Select Template field to select a template.
 |
Note: Check that the template defined in the Firm Settings for APX PayNow Format has the URL variable included. If the URL is missing and you continue the client receives a standard e-mail without the Pay Now request. |
To create a Pay Now request when creating bill(s)
-
Use your current billing workflow to send the bills to "Final" in your billing cycle.
-
On the create bill screen, select the bills you would like to finalize.
-
Click on Print & Post to finalize your bills.
-
You will be prompted with a list of the finalized bills with options to send email and to include a payment request.
-
-
Click on checkbox with the Pay Now request icon for the bills you would like to send an email with the payment request (embedded URL).
-
Click on Proceed to continue.
-
Emails are sent to the draft folder or directly to the client based on the email selection in the Firm Settings.
-
|
Note: Use the bill settings "Include APX Request for Payment with email" to automatically include a payment request when creating and emailing bills. |
To create a Pay Now request from the Billing module
Select the Billing module from the left navigation pane in the BILLING view.
Use the filters on the left to get a list of invoices you would like to send a Pay Now request email.
Select one outstanding invoice (one without a payment) or click on the checkbox to select multiple invoices.
Select the add  Pay Now icon payment request icon that becomes available to generate the Pay Now request email for each selected outstanding invoice with an URL embedded in the email.
Emails are sent to the draft folder or directly to the client based on the email selection in the Firm Settings.
|
Note: Pay Now request uses the email address defined on the file/matter Bill settings if this was setup, otherwise it uses the primary email address from the primary client on the file/matter. |
To resend a Pay Now request
-
Select the Billing module from the left navigation pane in the BILLING view.
-
Use the filters on the left to get a list of invoices with a Pay Now request.
-
Select an invoice or invoices (use the checkbox to select multiple invoices) with a Pay Now request.
-
Select Action > Resend Payment Request to recreate and resend the email(s) with the existing URL(s).
-
Emails are sent to the draft folder or directly to the client based on the email selection in the Firm Settings.
A Confirmation message displays. Click Yes to confirm resending the Pay Now request or No to return to the Billing module without sending the Pay Now request.
To delete a Pay Now request
Select an invoice or invoices (use the checkbox to select multiple invoices) with a Pay Now request, the  Delete icon becomes available.
Select the Delete icon to delete the Pay Now request(s).
Click Yes on the Confirmation message to delete the select payment request.
Receiving a payment from a Pay Now request
When a Pay Now request payment is successfully completed by your client using the embedded link from the email, the payment is automatically sent to your client file in Amicus and a notification email of the payment is sent to the responsible lawyer on the file.
Viewing a payment from a Pay Now request
-
Open the client's file.
-
Click on Bills in the BILLING view.
-
Click the '+' sign on the bill where the payment was applied to list the payment record.
|
Note: The Pay Now link on the email is active for 90 days. After 90 days the link becomes invalid and the client will be directed to contact the firm for assistance. At this time, you will be able to create a new Pay Now request from the Billing module. |
Related Topics