Billing > Receiving Client Payments
 Receiving Client Payments
Use the Receive Payments function to receive a payment from a Client:
-
Payment of Bills whereby money is deposited into a General Bank Account
-
Payment of Bills via application of General Retainer amounts (money is deposited to a General Bank Account but not yet applied, so not yet withdrawn from that account)
-
Payment of General Retainer on Files (money is deposited into a General Bank Account)
To receive money to Trust from a Client, use the Trust Receipt function instead—see Receiving Trust
 |
Note: Trust and General Retainer can also be applied against new charges at the time of billing. |
Receiving payment
Click the Transactions button on the Amicus Toolbar in the Billing-side Files, Clients, or Billing modules and choose Receive Payment to display the Receive Payment dialog.
Or, right-click on a bill in the Billing Index, a file in the Billing-side Files Index, or a client in the Billing-side Clients Index, and choose Receive Payment. You can also right-click on a bill in a Transactions view of File Details and choose Receive Payment.

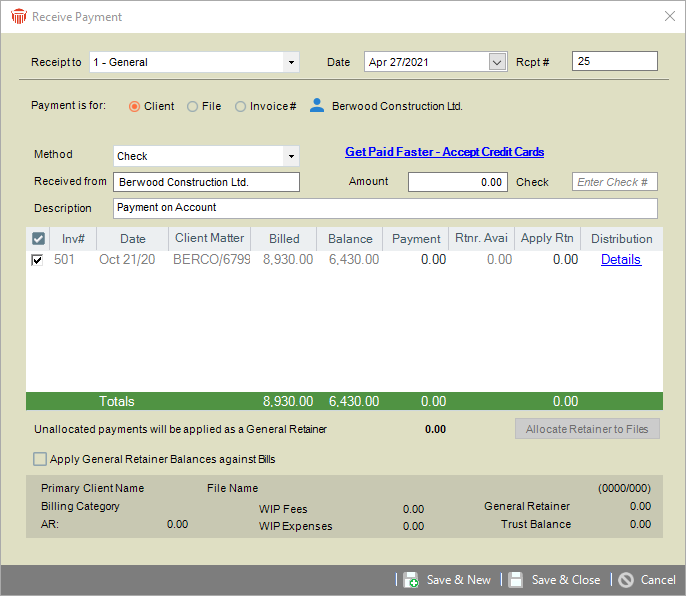
Enter basic information for the receipt:
Receipt to—General Bank Account to which money is being deposited. This field is not used if you are only applying General Retainer.
Date—Date that money is being received. Bills up to this date will be listed.
Receipt #(optional)—Number is automatically incremented (and overridable if permitted by your Firm Settings).
Show Bills Filtered By—Choose whether to list Bills for a Primary Client, a File, or an Invoice Number, and specify which one. If showing Bills for a particular Client or File, only outstanding Bills are listed. If showing Bills for a particular Invoice Number, you can choose include paid Bills.
Received from—The name of the person from whom payment is being received, which will appear on the printed receipt. The default is the name of the Primary Client on the File(s) for the Bills listed. You can type a name if desired.
Amount—Dollar value of money being deposited. If only applying General Retainer against Bills, enter zero.
Type—Method of payment (check, cash, credit card, electronic, or other).
Check #—Optional identification number such as a check number or credit card transaction number, which can be printed on reports or used for sorting.
Description—Description of the payment (default provided from Firm Settings).
Apply General Retainer Balances against Bills—Select this option to automatically apply General Retainer on Files against the corresponding Bills listed (shown in the Apply Rtnr. column). If multiple Bills are listed for a File, Retainer is applied in date order, starting with the oldest Bill. Clear this option if you want to clear the values in the Apply Rtnr. column.
Examine and edit information in the list of Bills as appropriate. (Skip this step if you are only adding new General Retainer.)
The list shows information about each Bill: the Invoice Number, AR Date, Client Matter ID, billed total, current balance outstanding, amount being paid from the new amount submitted by the Client, current General Retainer balance on the corresponding File, and amount being paid from General Retainer.
Allocating payment to Bills:
When the list is displayed, General Retainer balances are automatically allocated to the Bills first. (If there are multiple Bills on the same File, General Retainer is allocated to Bills in chronological order, starting with the oldest Bill.) Then the new payment amount is automatically allocated to the Bills, starting with the oldest Bill first.
If desired, edit the allocated amounts. Reducing the Payment amount on a Bill increases the Unallocated Payment amount below the list accordingly, and reducing the Apply Rtnr. amount increases the corresponding Rtnr. Avail. amount accordingly. Amounts are not automatically reallocated to the other Bills.
To skip payment of one or more of the listed Bills, clear the checkbox at the left on those lines. This clears the Payment and Apply Rtnr. amounts for those Bills.
Distributing payment within a Bill:
When finished allocating new payment and General Retainer on a Bill, you can click Details in the Distribution column to view or edit the distribution of that total payment within the Bill. The Payment Distribution dialog appears.
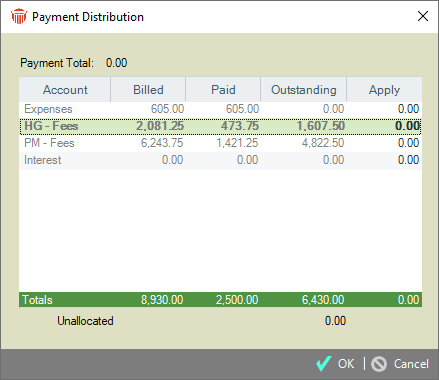
The total payment is automatically allocated between Taxes, Expenses, Timekeeper Fees, and Interest, as determined by settings for the firm, File, and Bill. If desired, edit values in the Apply column to change the allocation, and click OK.
Any payment amount left unallocated to Bills (that is, any overpayment) will be received as new General Retainer. This amount is shown below the list of Bills. Click the Allocate To Files button to specify how this General Retainer is allocated across the Client's Files.
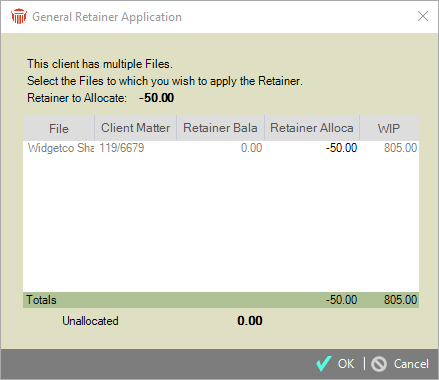
All Open Files for the Primary Client are listed. Edit the Retainer Allocation fields to distribute the full Retainer amount as desired and then click OK.
Click Save & New or Save & Close to save the Payment.
Printing receipts
The Administrator can set your firm to allow receipt printing and if so, to prompt first or always print automatically.
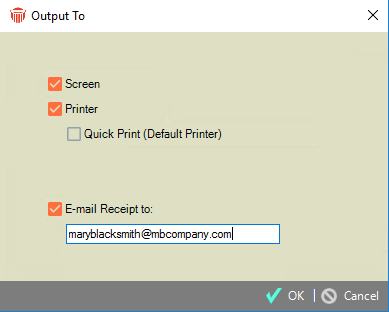
A receipt can be output in the following ways:
When you save a new Payment.
When you run the Receipts report from the Reports module. (This allows you to reprint a receipt if necessary).
The receipt shows only the cash receipt amount, omitting any General Retainer amount applied in the transaction.
Receipts cannot be printed for Payments that record Startup General Retainer Balances.
Related Topics