 Posting Final Bills
Billing > Creating Bills > Posting Final Bills
Posting Final BillsThe Final Bills view of the Create Bills dialog enables you to review and change some options for Bills before posting them.
To view or edit the Final Bills:
Select Final Bills from the navigation pane on the left.
Also, the Final Bills view opens directly if you create a Bill on a single File and click Save To Final.

Choose to show all Final Bills you have permission to view, or only the ones you created. Optionally, choose to show only the Bills for specific Responsible Lawyers, File Types, Billing Categories, or Primary Clients.
View, mark, edit, and delete Final Bills as desired.
For a Consolidated Bill in the list, you can click the + button at the left to expand the display, showing a sublist of the individual Files that have been billed together on the same invoice for the client.
To mark a Bill for processing together with other marked Bills, select the checkbox at the left. For example, you can click Print & Post on the Amicus Toolbar to print and post all marked Bills.
If you wish to send one or more Final Bills back to Draft for further review or editing, mark them in the list and click Send To Draft. Alternatively, right-click a single Bill in the list and choose Send To Draft.
Select the sequence in which Bills are printed:
By Responsible Lawyer (and then by Client Matter ID)
By Client Name: Last Name if an Individual or Company Name if a Company (and then by Client Matter ID)
By Client Matter ID
In the list sequence that Bills are currently sorted in the view.
 |
Note: If you choose to sort by Responsible Lawyer, the lawyer used for a Consolidated Bill is the one on the File that comes first if sorted by Client Matter ID. |
When Bills are posted, this sorting controls the sequence in which Invoice Numbers are assigned.
When ready, you may:
Click Print Preview to see the way your marked Final Bills will print.
Highlight a Bill in the list, right-click, and choose Print.
Click Print Bill Summary for a summary report of your marked Final Bills. This report shows for each Bill: the Client Matter ID, Client Name, Short File Name, invoice number, Responsible Lawyer, balance forward, and new amounts (Fees, Expenses, taxes, interest, and total).
Select the General Bank Account to which Trust Transfers to AR (if any) will be posted.
Choose whether to print checks for Trust Transfers to AR (if any), if Trust check printing is enabled for your firm by the Administrator
Print and post Bills—see below.
When finished, click Close or click a different view in the Navigation Pane of the Create Bills dialog.
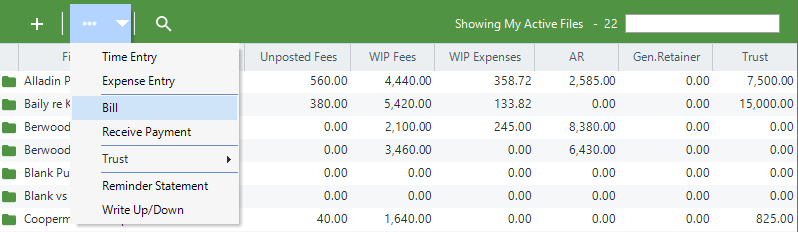
Click Print & Post to both print and post your marked Final Bills. Or, right-click a Bill in the list and choose Print & Post. One or more options dialogs will appear.
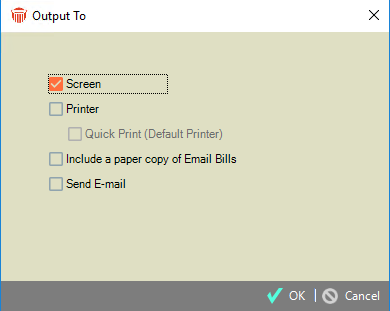
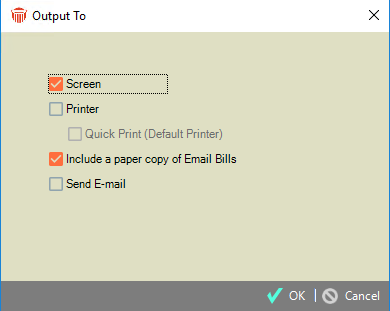
If you Print & Post a single Bill, and you have E-mail Integration enabled, you may optionally display the Bill on the screen, and/or print it, and/or send it as an e-mail attachment.
If you Print & Post a single Bill and don't have E-mail integration enabled, or Print & Post multiple Bills together, an E-mail Bills dialog appears so that you can confirm which Bills you want e-mailed, and even edit the e-mail address(es) to be used.
Bills on the Files marked for e-mailing (in their Bill Settings) are selected by default, but you may select other listed Bills as well.
Multiple e-mail addresses for a Bill must be separated by a semicolon—the e-mail will be sent To the first address, and Cc the other addresses.
Upon clicking proceed, you may optionally display the Bills on the screen, and/or print them.
When a Bill is posted, an Invoice Number is assigned and a Trust Transfer to AR (if appropriate) will occur. The Bill will vanish from the Final Bills list and appear in the Billing Index.
If e-mailing multiple Bills, or a single Bill without E-mail Integration, note that the e-mail(s) are either sent immediately or saved to Outlook's Drafts folder, depending on which option your Amicus Administrator chose in Firm Settings for this feature. The subject and body of those e-mails is also specified there.
If the File is set for E-billing, an E-bill format version of its Bill is automatically created as well.
 |
Tip: Posting a large number of Bills together is an intensive process. We recommend that other users not perform Billing transactions (including Time Entry posting) while the Bills are being posted. |
Related Topics