Billing > Creating Bills > Working with Draft Bills
 Working with Draft Bills
The Draft Bills view of the Create Bills dialog enables you to review and modify details of Bills that are in Draft status.
This topic covers:
Viewing or Editing the Draft Bills
Bill details - Fee Distribution
Viewing or Editing the Draft Bills
To view or edit the Draft Bills:
Click the Transactions button on the Amicus Toolbar in the Billing-side Files, Clients, or Billing modules and choose Bill. Or, right-click on an item in a Billing-side File or Client list and choose Bill to display the Create Bills dialog.
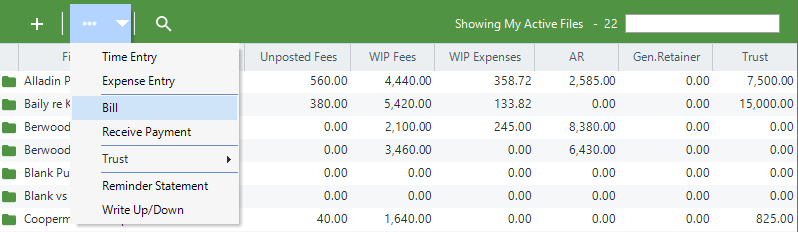
Select Draft Bills from the navigation pane on the left.
Also, the Draft Bills view opens directly if you create a Bill on a single File and click Send To Draft.
Choose to show all Draft Bills you have permission to view ("All Bills"), or only the ones you created ("My Bills"). And optionally, choose to show only the Bills for specific Responsible Lawyers, File Types, Billing Categories, or Primary Clients.
View, mark, edit, and delete Draft Bills as desired.
For a Consolidated Bill in the list, you can click the + button at the left to expand the display, showing a sublist of the individual Files that have been billed together on the same invoice for the client.
To mark a Bill for processing together with other marked Bills, select the checkbox at the left. For example, you can click Print Draft Bills on the Amicus Toolbar to print all marked Bills.
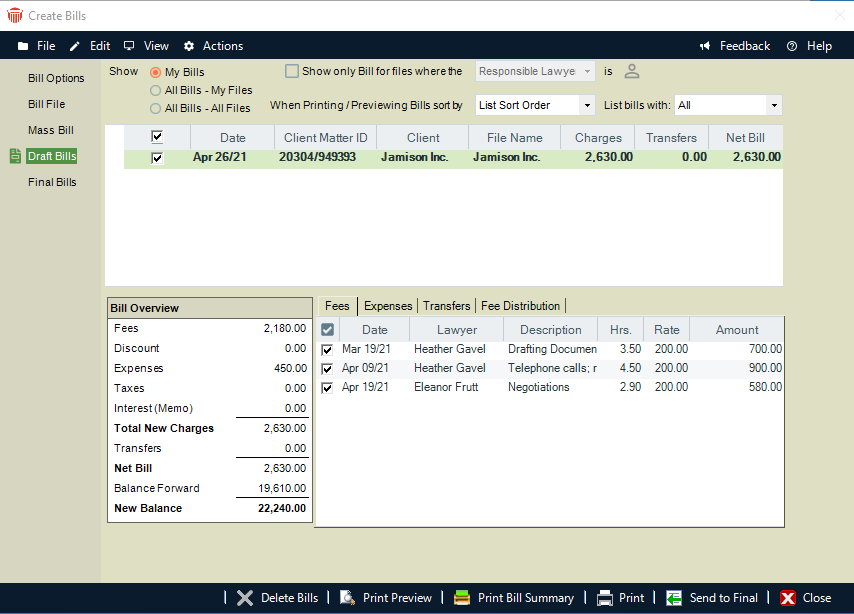
The bottom part of the view shows details of the Bill currently highlighted in the list above.
The Bill Overview section at the bottom left shows the current Bill amounts: new Fees and Expenses, total new charges, etc.
The Bill details section at the bottom center and right provides separate views of the Bill's Fees, Expenses, transfers, and fee distribution. For more information, see below.
Select the sequence in which Bills are printed (and previewed):
By Responsible Lawyer (and then by Client Matter ID)
By Client Name: Last Name if an Individual or Company Name if a Company (and then by Client Matter ID)
By Client Matter ID
In the list sequence that Bills are currently sorted in the view
Note that if you choose to sort by Responsible Lawyer, the lawyer used for a Consolidated Bill is the one on the File that comes first if sorted by Client Matter ID.
When ready, you may:
Click Print Bill Summary for a summary report of your marked Draft Bills. This report shows for each Bill: the Client Matter ID, Client Name, Short File Name, invoice number, Responsible Lawyer, balance forward, and new amounts (Fees, Expenses, taxes, interest, and total).
Click Print Preview to see the way your marked Draft Bills will print. (The Invoices Number is not included.)
Click Print to print your marked Draft Bills for review and approval.
Click Send To Final to create Final Bills from your marked Draft Bills. Alternatively, right-click a Bill in the list and choose Send To Final.
TIP: Sending a large number of Bills to Final Draft is an intensive process. We recommend that other users not perform Billing transactions (including Time Entry posting) while the Bills are being sent.
When finished, click Close or click a different view in the Navigation Pane of the Create Bills dialog.
Bill details - Fees view
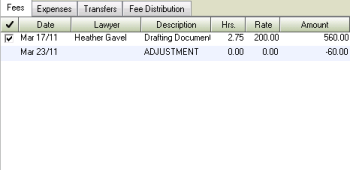
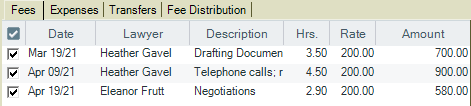
The Fees view lists all Fees on the Bill, regardless of status. "No Charge" Fees, and optionally Non-Billable "Bill" Fees are shown (and identified in the Description). The list also includes any Courtesy Discounts (negative Fee Adjustments) done when the Bill was created. (Positive Fees Adjustments done simply appear as additional new Fees.)
To open the Time Entry Details dialog for a Fee, for viewing, editing, or deleting, select it, right-click, and choose Open.
To delete a Time Entry and its Fee, select it, right-click, and choose Delete.
To exclude a Time Entry and its Fee from the Bill (without deleting it), clear its checkbox.
If you wish to remove a Courtesy Discount Fee Adjustment from the Bill, delete the Bill and start over.
Bill details - Expenses view
- The Expenses view lists all Expenses on the Bill.
-
To open the Expense Entry Details dialog for an Expense, for viewing, editing, or deleting, select it, right-click, and choose Open.
-
To delete an Expense, select it, right-click, and choose Delete.
-
To simply remove an Expense from the Bill without deleting it, clear its checkbox.
-
If you wish to remove an Expense Adjustment from the Bill, delete the Bill and start over.
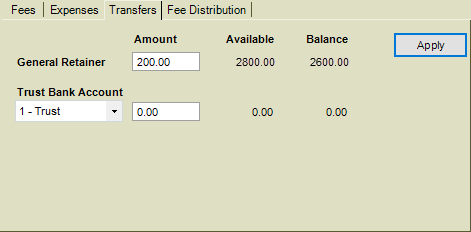
Bill details - Transfers view
- The Transfers view shows Trust and/or General Retainer Transfer amounts and balances.
-
You can edit the amount of Trust to be applied to new charges (including interest). And you can edit the amount of General Retainer to be applied to new charges (including interest). Amounts are applied in a standard sequence: General Retainer is applied first, and then Trust to new charges (if set in the File's Bill Settings).
-
If the File has funds in more than one Trust Bank Account, you can select the one from which money will be transferred, and the "Receipt to" General Bank Account, to which that money will be transferred.
-
When finished, click Apply.
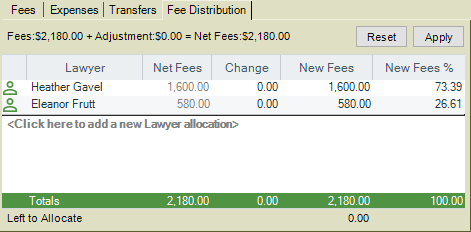
Bill details - Fee Distribution
-
The File's Bill Settings show how Fees will be distributed among lawyers (Timekeepers) when Payments to the Bill are made by clients.
-
The Fee Distribution includes those original Fees, and any adjustments that were done manually in Bill Single File or automatically from a Discount, Contingency Fee, or Flat Fee calculation.
-
You can change the distribution of adjustment among lawyers, but cannot change the total adjustment (or Net Fees). Add lawyer allocations if desired. When finished, click Apply. Or, to undo your changes, click Reset.
Related Topics