Billing > Creating Bills > Billing a single File
 Billing a single File
This topic covers:
Creating a Bill
To create a Bill for a single File, go to the BILLING-side:
-
Click Transactions on the taskbar in the Files, Clients, or Billing modules and choose Bill. Or, right-click on an item in a File or Client list and select Bill.
-
If the File is a Contingency or Fixed Fee File, or is a Billable File with a Quoted Amount or Discount defined, a dialog appears, showing relevant information and allowing you to choose what amount to bill. For example, for a Quoted Amount File you can choose to increase/decrease the Fees amount to the quoted amount.
-
Split Bill—If the File is set for Split Billing and is the Master File, separate Bills will be automatically created for it and each of its Sub Files, with its Fees/Expenses allocated between the Bills as pre-defined. Sub File Bills will additionally include any File-specific Fees/Expenses within the billing period. For more information, see Split Billing.
-
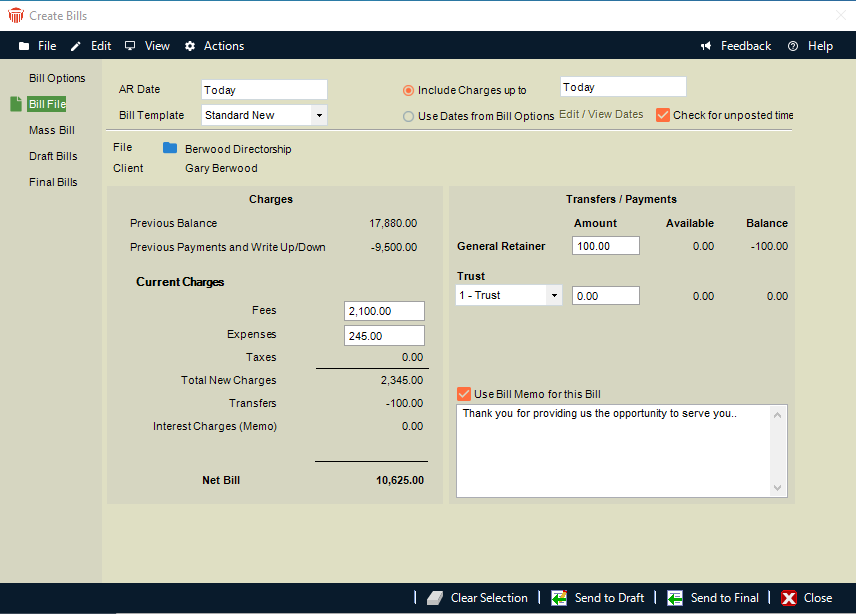
The Create Bills dialog appears, open to the Bill Single File view.
-
Fill in basic details as appropriate:
-
Specify the AR Date of the Bill, which appears on the Bill and is used for aging and interest calculations (if any). Transactions later than this date will not be included on the Bill.
-
Choose whether to include all File transactions up to a specified date, or include particular types of transactions (Time/Fees, Expenses, Payments/Receipts, and Trust) up to dates specified in the Bill Options view. To open that view, click Edit/View Dates or click Bill Options in the navigation list in the Control Panel. Unposted Time Entries are not included.
-
The Bill Template set for the File is used by default. Optionally, select a different Bill Template here. Templates can be created and edited from the Reports module. To see a sample printout for your selected Template, click Preview.
-
Optionally select or clear the Check for unposted time checkbox. If selected, the next time you identify a File you will be warned if there are any unposted Time Entries on it. (Unposted Time Entries are not included on Bills.)
-
Select the File if not already selected. Once selected, the Primary Client's name appears in the Client field, and the charges and transfer balances appear below.
-
The Previous Balance amount is the Net Bill amount from the previous Bill for the File, excluding any nonpostable interest charges.
-
The Previous Payments and Write Up/Down amount is the total applied to previous Bills for the File during the Bill transactions period chosen. This amount does not include the entry or application of General Retainer on the current Bill.
-
The current Fees amount includes fees from only Bill Time Entries for the Bill transactions period chosen. Any No Charge Time Entries are excluded from the fee calculation. However, "No Charge - Show On Bill" items, and optionally Non-Billable "Bill" items, can be shown on Draft and Final Bills without a dollar value.
-
Taxes are calculated on current Fees (assuming that the File is set for taxation) and on current Expenses that are set for taxation.
-
Interest charges are calculated if the File is set for that. A Firm Setting determines whether or not these charges are posted to AR or merely shown as an item on Bills.
-
Optionally, adjust the amounts: Fees, Expenses, or Trust and/or General Retainer transfer amounts and Trust Bank Account. See below for details.
-
Optionally, clear the Bill Memo option, or select it and enter or edit the text to be printed on Bills.
-
-
Click Send To Final if you are satisfied with the Bill and are about ready to post it. Otherwise, click Send To Draft to move the bill to Draft status for review and/or adjustment.
-
From a Draft Bill, you can remove or edit Time and Expense Entries if necessary—see Working with Draft Bills. You can change the status of a Final Bill back to Draft if you need to make any changes.
Adjusting the Fees amount
Optionally, edit the Fees amount. When you Tab out of the field or click elsewhere, a Fee Adjustment dialog appears, asking how you would like this change shown on the Bill. The option set for the File is provided as the default.
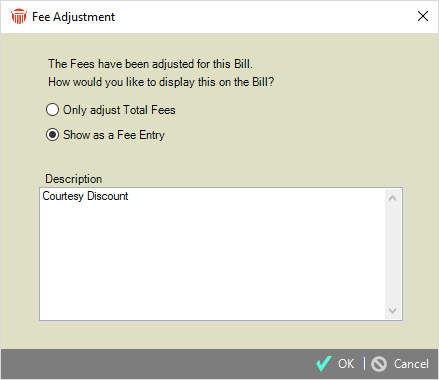
You may choose any of the following:
-
For a Fees increase or decrease, simply adjust the Fees amount.
-
For a Fees decrease, optionally show a Courtesy Discount item on the Bill and, if desired, edit the description to be shown.
-
For a Fees increase, optionally show an additional Fee entry on the Bill, and, if desired, edit the description to be shown.
-
The Taxes, Total New Charges, and Net Bill amounts are automatically recalculated as appropriate. Transfer amounts are recalculated for a Fees decrease, but not for a Fees increase.
Adjusting the Expenses amount
Optionally, edit the Expenses amount. When you Tab out of the field or click elsewhere, an Expense Entry dialog appears. Enter the Expense information. When you click OK, that new Expense is added to the Bill. It will be saved to the File when the Bill is posted.
The Taxes, Total New Charges, and Net Bill amounts are automatically recalculated as appropriate. Transfer amounts are recalculated for an Expenses decrease, but not for an Expenses increase.
Adjusting the Transfer amounts or Bank Accounts
Optionally, edit the amount of Trust to be applied to existing AR and to new charges (including interest). And you can also edit the amount of General Retainer to be applied to new charges (including interest). Amounts are applied in a standard sequence: General Retainer is applied first, and then Trust to new charges (if set in the File's Bill Settings).
You can also select the Trust Bank Account from which money will be transferred, and the "Receipt to" General Bank Account, to which that money will be transferred.