 Generating a Document
Document Assembly > Generating a Document
Generating a DocumentOnce you are set up for Document Assembly, you are ready to generate documents. Everything is set up for you: all you have to do is choose a few menu commands.
Amicus Attorney comes with several sample Merge Templates. You can try using these examples before you start creating your own.
There are various places in Amicus from which you can generate documents:
The Files Index or a File Details window
The People Index or a Person Details window
A Search Results list that includes only Files or People
A DO button on an Event
For instructions on generating documents from each of these places, see the following sections.
For details on how many documents are generated, and on which File, People, and People On The File information is included, see Information merged when documents are generated.
After generating a document, click an appropriate button on the Amicus Taskbar to add the document to an Amicus record.
To generate a document from File(s), complete the following steps. For information about Search Results lists, see Working with Search results.
From the Files Index or a Search Results list, optionally select one or more particular Files for which you wish to generate a document. Then choose Actions > Generate A Document from the main menu, or click Generate Document on the Advanced Toolbar. A right-click command is also available.
Or from the Documents Index, select one or more particular Documents, right-click, and choose Generate Document Same File to display the Generate a Document dialog.
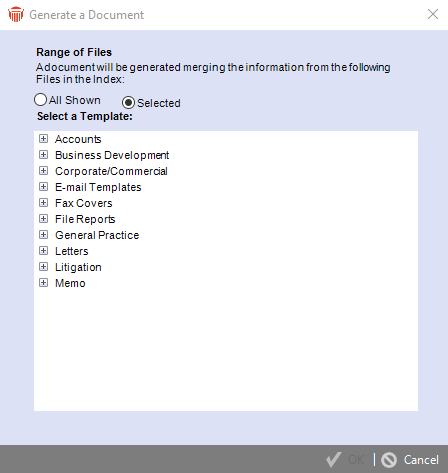
Range of Files — Specify which Files to generate the document for:
Shown — Generates a file containing a separate document for each of the Files currently shown in the list.
Selected — Generates a file containing a separate document for each of the Files you selected.
 |
Notes to HotDoc Users:
|
Select Template—Select one of the listed Merge Templates. Be careful to select one that is appropriate for your word processor and document automation program (if any).
Click OK.
If the Merge Template specifies Extended Fields items that are date-sensitive (such as Events), and it is set to request a date or day range, the Date Range dialog displays. Specify the range to filter the Extended Fields, and click OK
Your word processor is automatically launched and the generated file appears in it. If you have your auto-merge preference set, or are generating from a HotDocs Form template, the Amicus data will already be merged into the file. Otherwise, you will need to click the Perform Merge button on the Amicus Merge Toolbar in the word processor in order to merge in the information.
You can review the document, edit it, and optionally print and/or save it. You can also attach it to Amicus (as a Document or Library Page) from the Amicus Tasks Toolbar.
|
Notes to HotDoc Users:
|
To generate a document from the File Details window:
Select the People On The File for whom information should be included.
Choose Actions > Generate A Document, or click Generate Document on the Advanced Toolbar. Depending on your preference setting, either the Basic or Advanced view of the dialog appears.
To switch between Basic and Advanced views, select the appropriate option at the top of the dialog.
Basic view
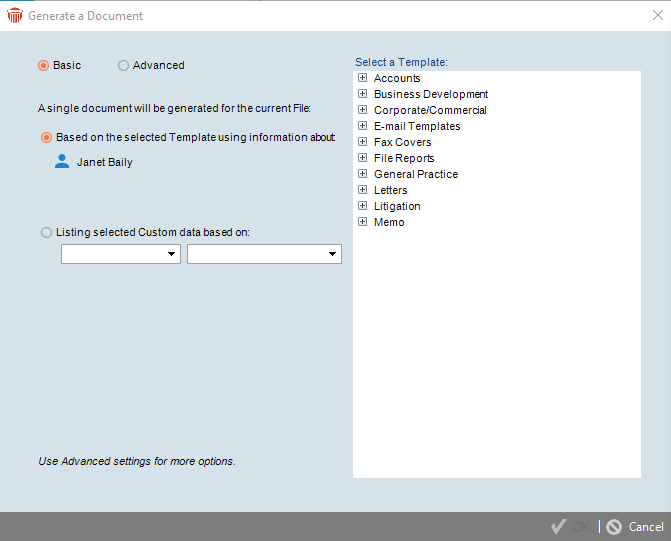
From Basic view, select the Based on the selected Template... option to generate a single document (e.g. letter), incorporating information about the people you previously selected in the People On The File list. If none were selected, information about the first Contact on the File is used.
If the Merge Template you hhave chosen contains People variables (e.g. salutation for a letter), information about the first pre-selected Person will be merged into those variables.
If the Template contains People On The File variables (used to list information relating to all or some of those assigned to the File), information about all pre-selected People will be merged into those variables.
Go on to step 6.
Alternatively, select the Listing selected Custom data... option to output all the Custom Fields for a Custom Page or Record. See Custom Field output.
Advanced view: Number of Documents section
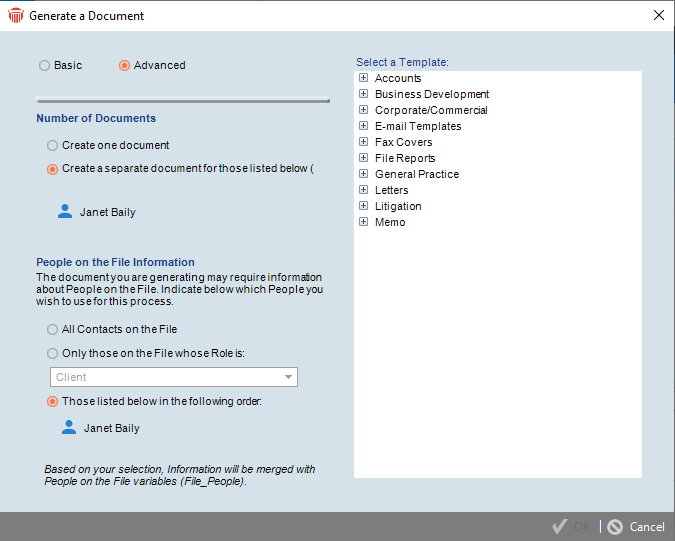
From Advanced view, one or more documents (e.g. letters) may be generated.
To generate a single document, select the Create One Document option. If the Merge Template you have chosen contains People variables, information about only the first pre-selected Person will be merged into those variables. If you did not pre-select any People, information about the first Contact on the File is used.
To generate a separate document for each of several People, choose the second option and click the Select People button to make your selection. If the Merge Template you have chosen contains People variables, information about each of the selected People will be merged into those variables.
Advanced view: People On The File section
When generating a document, information about all or particular People assigned to the File will be merged into the People On The File variables in the Merge Template. Select an option to indicate which People on the File to include information about:
All Contacts on the File
People on the File whose Role on the File is the one you select in the adjoining list box
Selected People on the File — Click the Select People button to make your selection from your preselected Contacts and Firm Members.
Select Template — In either Basic or Advanced View, select one of the listed Merge Templates. Be careful to select one that is appropriate for your word processor and document automation program (if any). Click OK.
If the Merge Template specifies Extended Fields items that are date-sensitive (such as Events), and it is set to request a date or day range, then the Date Range dialog appears. Specify the range to filter the Extended Fields, and click OK.
Your word processor (or HotDocs program) is automatically launched and the generated document appears in it. If you have your auto-merge preference set, your Amicus data may already be merged into the document. Otherwise, you will need to click the Perform Merge button on the Amicus Merge toolbar in the word processor in order to merge in the information.
You can review the document, edit it, and optionally print and/or save it. You can also attach it to an Amicus File or Contact (as a Document or Library Page) from the Amicus Tasks toolbar.
From the Basic view of the Generate Document dialog, you can select the Listing selected Custom data... option to generate a Word or Excel document showing all the Custom Fields for the Custom Page or Record you choose. This method does not involve a Merge Template.
The output is saved to the Windows Documents folder on your workstation. You may use Save As to rename and save the output to a shared location, and/or use the Amicus Tasks Toolbar in the document to attach it to the File.
This feature requires that SQL Reporting Services be installed and configured by your Amicus Administrator.
 |
Tips:
|
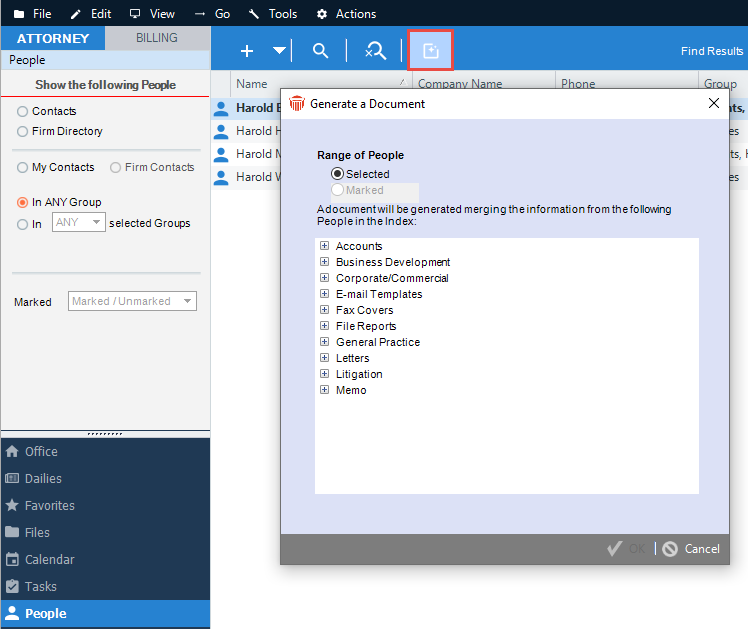
To generate a document from People, complete the following steps. For information about Search Results lists, see Working with Search results.
From the People Index or a Search Results list, optionally select one or more People. Then choose Actions > Generate A Document, or click Generate Document on the Advanced Toolbar.
The Generate a Document dialog appears.
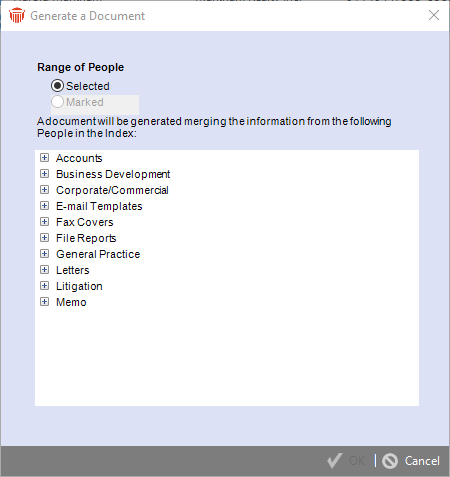
Range of People — Specify which People to generate the file for:
All Shown — generate a file containing a separate document for each of the People currently shown
Selected — generate a file containing a separate document for each of the People you selected
Marked — generate a file containing a separate document for each of the Marked People
|
Note to HotDocs Users: HotDocs generates only a single document per session. Later versions of HotDocs offer both Developer and User editions—while Developer edition is necessary for creating templates, User edition is sufficient for generating documents. |
Click OK.
Your word processor (or HotDocs program) is automatically launched and the generated document appears. If you have your auto-merge preference set, the Amicus data may already be merged into the document. Otherwise, you will need to click the Perform Merge button on the Amicus Merge toolbar in the word processor in order to merge in the information.
You can review the document, edit it, and optionally print and/or save it. You can also attach it to an Amicus File or Contact (as a Document or Library Page) from the Amicus Tasks toolbar.
To generate a document from the Person Details window:
Choose Actions > Generate A Document from the main menu or click Generate Document on the Advanced Toolbar to display the Generate Document dialog.
Range of People — Specify which People to generate the document for:
All Shown — Generates a file containing a separate document for each person currently shown in the list
Selected — Generates a file containing a separate document for each person selected
Select a Template — Select one of the listed Merge Templates. Be careful to select one that is appropriate for your word processor and document automation program (if any).
Click OK
Your word processor (or HotDocs program) is automatically launched and the generated document appears in it. If you have your auto-merge preference set, the Amicus data may already be merged into the document. Otherwise, you will need to click the Perform Merge button on the Amicus Merge toolbar in the word processor in order to merge in the information.
You can review the document, edit it, and optionally print and/or save it. You can also attach it to an Amicus File or Contact (as a Document or Library Page) from the Amicus Tasks toolbar.
The Intelligent Assistance feature enables you to add a DO button to an Event, and set it to generate documents using a specified Merge Template. Generating a document this way is particularly useful because the DO button also starts the Timer. Furthermore, the To Do can be incorporated into a Precedent for performing whole transactions. For more information, see Having Amicus Attorney DO a task for you.
To generate documents from an Event, simply click the DO button next to the Event in an Event list, anywhere in Amicus.
Related Topics