Time > Timing an Activity
 Timing an Activity
The Timer is easily accessible tool for tracking the time you spend on an activity and for simultaneously creating a Time Entry.
This topic covers:
Starting the Timer
You can time an activity using the Timer controls in the Amicus Timer Toolbar.
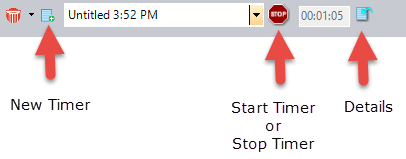
To show the Timer Toolbar, choose View > Toolbars > Show Timer. Or, on the Amicus Floating Toolbar, click the Show Timer button. This starts a new Timer if one is not already running.
To start a new Timer when the Timer Toolbar is already shown, click the New Timer button on the Toolbar.
When the Timer is running, a Stop Timer button replaces the Start Timer button.
Whenever you open the Timer Toolbar, or click the New Timer button, or click the Start Timer button without a File shown in the Timer list box, you immediately create a new, untitled Time Entry, which is then shown in the Timer list box.
Specifying details for a new Time Entry
To view or modify details of the Time Entry, click the Details button in the Timer section of the Amicus Floating Taskbar. The Time Entry Details dialog appears. If no File is associated with the Time Entry yet, the Select Files dialog will appear, depending on your preferences.
To associate a File with the Time Entry, select the desired File in the Select Files dialog.
 |
Note: If you do not associate a File with the Time Entry, the Time Entry remains untitled, and a reminder to associate a File with it will appear on the next day's Practice Reminders. |
In the Time Entry Details dialog, which appears next, you can choose an Activity Code if you wish. You can also modify the other details if necessary. For more information, see Filling in the Time Entry details.
Notice that the Timer is still running in the Amicus Floating Toolbar. To close the Time Entry Details dialog while continuing to time the activity, click OK. The Timer list box now shows the name of the File you selected.
Stopping and restarting the Timer
If the activity you are timing is interrupted, you can stop the Timer by clicking the Stop Timer button. The Stop Timer button is replaced with the Start Timer button, which you can click to resume timing from where you left off.
To restart the Timer on one of today's unposted Time Entries, select it in the Timer list box. You can then see the corresponding Time Entry details by clicking the Details button. The Timer continues to run on the selected Time Entry until you click the Stop Timer button or start another Timer.
How many Timers?
The Timer can be running on only one Time Entry at a time. If you are running the Timer on one Time Entry, and then start the Timer in another Time Entry (either by selecting it in the Timer list box or by opening another Time Entry Details dialog and starting the Timer in it), the previous Time Entry stops running.
If you start a new Timer on a File that is already listed in the Timer list box for today, one of your Time Preferences determines whether a separate Time Entry is created, the two Time Entries are combined, or a prompt appears so that you can choose which to do.
The Timer continues to run until you click the Stop Timer button, or start the Timer on another Time Entry, or log out of Amicus Attorney. You can change the time on a Time Entry any time until you post it.
|
Note: If the Timer is running on an Unposted Time Entry that is associated with a File, the Timer stops automatically if you post that Time Entry. |
Automatically starting the Timer
You can set preferences to start the Timer and create a Time Entry on a variety of occasions—for example, when clicking a DO button.
Phone Call Timer
A Phone Call Timer always starts automatically when you create an incoming or outgoing Phone Call. This Phone Call Timer is separate from the Time Entry Timer, and is not affected by the Time Entry Timer controls.
Minimum Time
One of your Time preferences sets the minimum time your Time Entries can have—e.g. 0.2 hour, which is equivalent to 12 minutes.
If you click OK in a Time Entry Details dialog with the Timer stopped, the amount shown in the Time Entry dialog will be automatically changed to the minimum (0.2 hour). If you then restart the Timer, it restarts from this minimum time.
Your minimum time preference does not affect the Timer otherwise. If you start or stop the Timer in the Amicus Floating Toolbar or in a Time Entry Details dialog and do not click OK, the actual time is shown and stored.
Rounded-Up Time
Another of your Time preferences sets the rounding unit for Time Entry duration at the time of posting to your accounting system—e.g. 0.1 hour, which is equivalent to 6 minutes. This should be set to match the rounding required by your accounting system.
The Duration of a Time Entry, shown in the Unposted view, always shows the time that would be posted. To begin with, it shows the minimum time. If the Timer runs longer than the minimum time, the Duration increases by the rounding unit. For example, if the minimum time is 12 minutes and the rounding unit is 6 minutes, the Duration would start at 12 minutes, then change to 18 (which is 12 + 6), then change to 24
(which is 12 + 6 + 6), and so on.
Your rounding unit preference does not effect the time shown in the Time Entry Details dialog until after it has been posted.
Related Topics