HotDocs Advance Integration > HotDocs Author > Create a New Template
 Create a New Template
As author of a template, you have control over the content, behavior, as well as the look and feel of your HotDocs Interviews.
 |
Note: If you only use Amicus Attorney variables your user will not have to complete a HotDocs Interview. |
This topic covers:
Creating a New Template
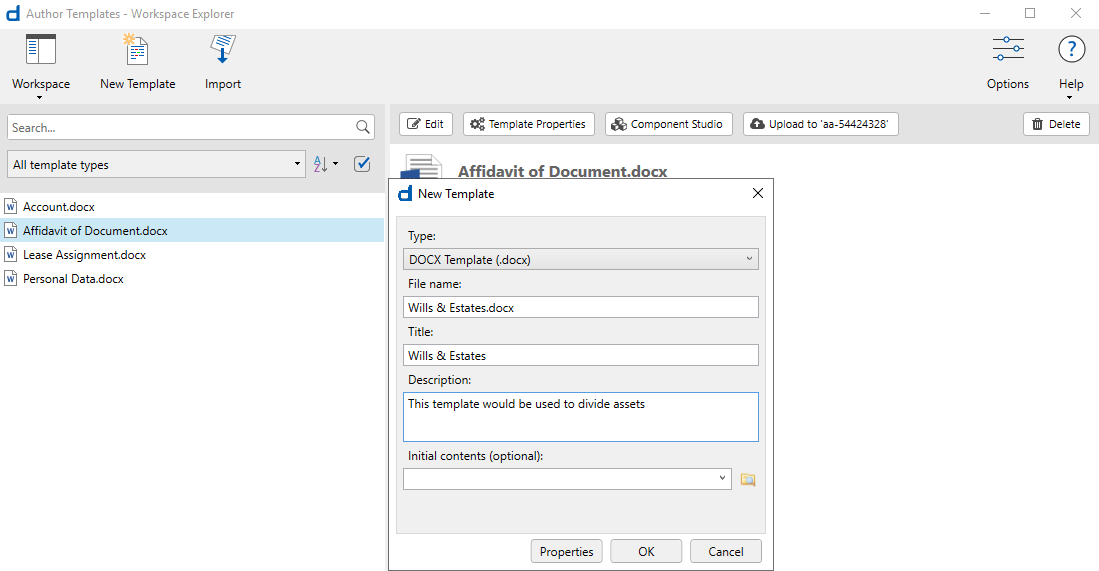
To create a New Template you must have HotDocs Author installed, then you need to open Workspace Explorer.
- Go to Office > Merge Templates to display the Template Management window and click HotDocs Author to launch Workspace Explorer.

- Click New Template to display the New Template dialog.
Note: The Edit, Template Properties, Component Studio and Upload to HotDocs Advance buttons become activated in the taskbar.
-
Complete the initial screen by entering a File name, Title, Description and Initial contents (optional).
-
Click Properties to display the Template Properties dialog to view and edit template details and set options affecting interviews and document assembly. You can also access this dialog from the HotDocs Author tab on the Word ribbon.
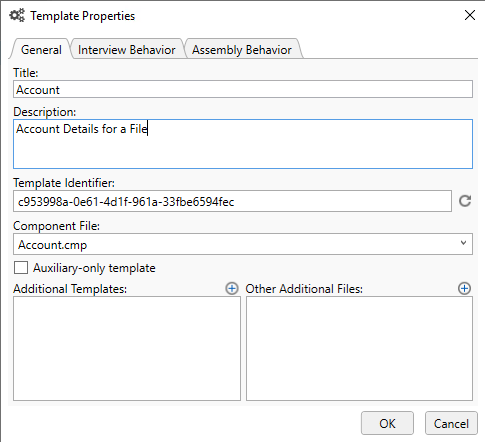
Template Properties
-
Enter or edit the fields under the General tab as appropriate:
-
Title –Displays the template title that displays in the template details pane of Workspace Explorer, the HotDocs Interview title, and in HotDocs Advance if you wish.
-
Description – The text that appears below the title of the template in the template details pane of Workspace Explorer, with the exception of auxiliary-only templates.
-
Template Identifier – Displays the Globally Unique Identifier (GUID) used to manage the template's life cycle.
-
Component File – The component file the template points to. You can choose a different component file from the drop-down list.
-
Auxiliary-only – Click this checkbox if you intend to use the current template only to augment the contents and functionality of another template. If you set this property on a template, it can only be uploaded to HotDocs Advance by the template that references it.
-
-
To see the template in Workspace Explorer, you must change the filter setting to Include auxiliary-only templates.
-
Additional Templates – Click the (+) button to manually set a dependency on other templates that you want HotDocs Advance to include when you upload your template.
-
Other Additional Files – Click the (+) button to list additional files. For example, graphic files included in the template.
-
-
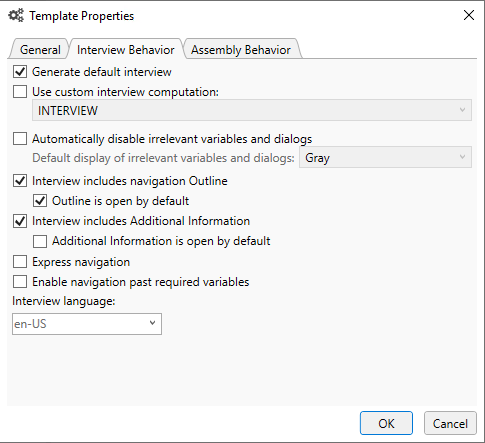
Click the Interview Behavior tab to set options for how the template user views and interacts with the interview:
-
Generate default interview – The questions are presented in the order in which the components occur in the template unless you add components to dialogs.
-
Use custom interview computation – Selecting this option enables you to select a custom interview computation from the drop-down list. If you have not created a custom interview, it only displays the default blank INTERVIEW computation. For Answer Intakes, this option is always selected.
-
Automatically disable irrelevant variables and dialogs – Disables the variable and/or the dialog containing the question when a template user's answer to a given question causes a variable or dialog in the interview not be needed.
-
Default display of irrelevant variables and dialogs – Determines HotDocs Advance default display behavior for irrelevant variables and dialogs.
-
Show – Displays the question or dialog, even if the variable is irrelevant.
-
Gray – Displays, but graphically "grays out" the question or dialog and enables it.
-
Hide – Does not display the question or dialog to the user.
-
Interview includes navigation Outline – Determines whether the interview outline is included in the interview.
-
Outline is open by default – Determines whether the interview outline appears opened to the left of the interview tab when the interview first loads.
-
Interview includes Additional Information – Determines whether the Additional Information pane appears to the right of the interview.
-
Outline is open by default – Determines whether the interview outline appears opened to the left of the interview tab when the interview first loads.
-
Interview includes Additional Information – Determines whether the Additional Information pane appears to the right of the interview.
-
Additional Information is open by default – Determines whether the Additional Information pane appears opened to the right of the interview when the interview first loads.
-
Express navigation – When selected, the interview navigation functions in an "express" manner. For example, clicking the Next button during the interview will skip any child dialogs and proceed to the next dialog.
-
Enable navigation past required variables – Enables a template user in an interview to navigate past a dialog that contains a required question (from a variable that you have made required with a REQUIRE instruction). Template users must still answer the required question before completing the interview.
-
Interview language – Enables you to choose the language to display your interview user interface elements in (strings, text boxes, prompts, etc.). You can type a language code other than those provided in the drop-down, though if you choose language for which there is no HotDocs module, HotDocs only provides you with a limited set of interview behaviors. If you delete the inherited setting for this property, the interview detects the locale from the browser (if possible), or it falls back to the locale specified by the server default setting.
-
The initial interview language property corresponds to what you choose in the Default Language for New Templates property in the Options dialog box.
-
-
Click the Assembly Behavior tab to determine how HotDocs Advance displays some of the content in the final assembled document.

-
Assembled document name – The assembled document's title and filename.
-
Use a computation – Click this checkbox and select a computation from the drop-down list to use that computation as the assembled document's title and filename.
-
Default unanswered text – Select the placeholder to insert into the assembled document in place of unanswered questions from the interview.
-
*** Variable *** – Surrounds the unanswered variable by three asterisks. For example, ***EmployeeName***.
-
[Variable] – Surrounds the unanswered variable by square brackets. For example, [EmployeeName].
-
Underscores – Seven underscores in a line, i.e. _______.
-
Asterisks – places six asterisks in a line, i.e. ******.
-
Nothing – Nothing in place of the unanswered component.
-
Assembly formatting language – Choose the language you want to use for formatting Date and Number Values when assembling your document. The initial value that displays corresponds to what you chose in the Default Language for New Templates property in the Options dialog box.
-
-
The default language is "en-US".
-
Post Assembly Processing – Provides further processing to a document after assembly. There are two options available under this heading that only enable for DOCX templates:
-
Update Table of Contents, References, Fields, Etc. – Updates the document's table of contents and/or index after assembling the final word processor document. HotDocs updates these references based on any changes applied during document assembly.
-
Convert to PDF – Updates your document and converts the assembled DOCX document to PDF and delivers the PDF document as the final output.
-
When you are ready for users to use your templates to create their own customized documents, click OK, then click
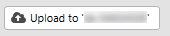 from the Workspace Explorer taskbar to upload your template to HotDocs Advance.
-
-
Related Topics
