Customizing the Database > Designing Custom Fields, Pages, and Records > Managing
 Managing Custom Pages and Records
This topic covers:
Management dialog
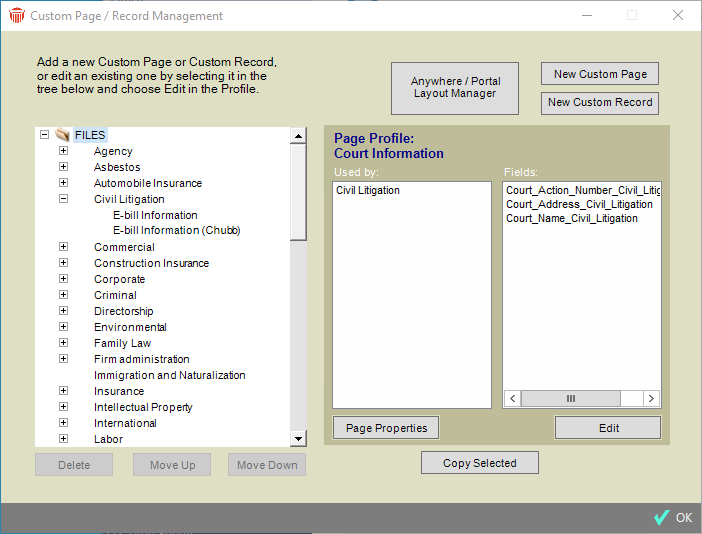
To design Custom Pages and Records, first go to the Office module and choose Custom Pages And Records on the navigation list. The Custom Page/Record Management dialog appears.

The navigation list at the left enables you to quickly review the Custom Pages and Records defined for the firm. Pages are listed by record type (Files or People). File Custom Pages are further categorized by File Type. To help you identify a selected Custom Page or Record, a summary list of its current Fields is shown at the lower right.
 |
Note: A Page designated for use with more than one File Type will appear more than once in the navigation list. You may add a new Page or Record, or select an existing Page or Record to edit, copy, or delete (preserving the subfile structure). Also remember to set security rights and indexing on the new folder appropriately. |
Creating a "blank" new Custom Page or Record
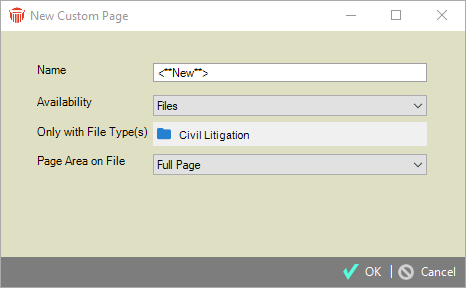
To create a new, empty Page or Record, click New Custom Page or New Custom Record in the Custom Page/Record Management dialog. The New Custom Page or New Custom Record dialog appears.

Specify the basic properties of the Page or Record:
-
The Name that will be shown in File or Person Details dialogs, in the Page or Record and in the navigation list of the control panel.
-
Specify whether it is available in Files or People, or both.
-
For a Files Page or Custom Record, specify the File Types to which it applies.
-
For a Files Page (or a Files And People Page), specify "Full Page" to use the full area of the File Details dialog (hiding the People On The File section), or "Half Page" to use only brad area at the right (and still display the People On The File section).
Then click OK. For information about editing the design and properties of a Page or Record, see Designing a Custom Page or Record.
Creating a new Custom Page or Record based on an existing one
To copy an existing Page or Record, select it in the Custom Page/Record Management dialog and click Copy Selected. The Custom Page or Record Designer dialog appears.
Or, you can copy a Page or Record by clicking Copy Page or Copy Record while displaying that Page or Record in the Designer dialog.
The default name of the new Page or Record is the original name with a number appended. For example, a copy of "Incorporation" will be named "Incorporation-1".
To edit the Name, the File Type in which the Page is available, or other basic properties of the new Custom Page or Record, right-click in a blank area of the Designer dialog, choose Show Custom/Page Properties in the shortcut menu, and edit the information in the dialog that appears. Change the properties as desired before saving the new Page or Record. For details, see Editing the properties of a Custom Page or Record.
For information about editing the contents and layout of a Page or Record, see Designing a Custom Page or Record.
Editing an existing Custom Page or Record
To edit a Page or Record, select it in the Custom Page/Record Management dialog and click Edit. The Custom Page or Record Designer dialog appears. For information about editing the design and properties of a Page or Record, see Designing a Custom Page or Record.
 |
Tip: To edit the Name or other basic properties of a Custom Page or Record, right-click in a blank area of the Designer dialog, choose Show Custom/Page Properties in the shortcut menu, and edit the information in the dialog that appears. However, some properties cannot be freely changed once the Page or Record is in use. For details, see Editing the properties of a Custom Page or Record. |
Changing the sequence of Custom Pages
To rearrange the list of Custom Pages shown in File Details (for a particular File Type) or in Person Details, select a Custom Page in the Custom Page/Record Management dialog and click Move Up or Move Down as appropriate.
Deleting a Custom Page or Record
To delete a Page or Record, select it in the Custom Page/Record Management dialog and click Delete. You can only delete items that have not yet been used to store data. Otherwise, data would no longer be accessible.
Or, you can delete a Page or Record by clicking Delete while displaying it in the Designer dialog.
 |
Warning: Deleting a Page or Record will result in loss of access to any data that has been entered by users on that Page or Record. |
Related Topics
