Documents > Working with the Document list from the Documents module
 Working with the Document list from the Documents module
The Documents module provides a convenient, single point of access to the firm's Documents. Filter the list as desired, or perform a Document search. Open, edit, print, or delete Documents. And in an Amicus-Managed environment, check your Documents in or out.
This topic covers:
Opening the Document Index
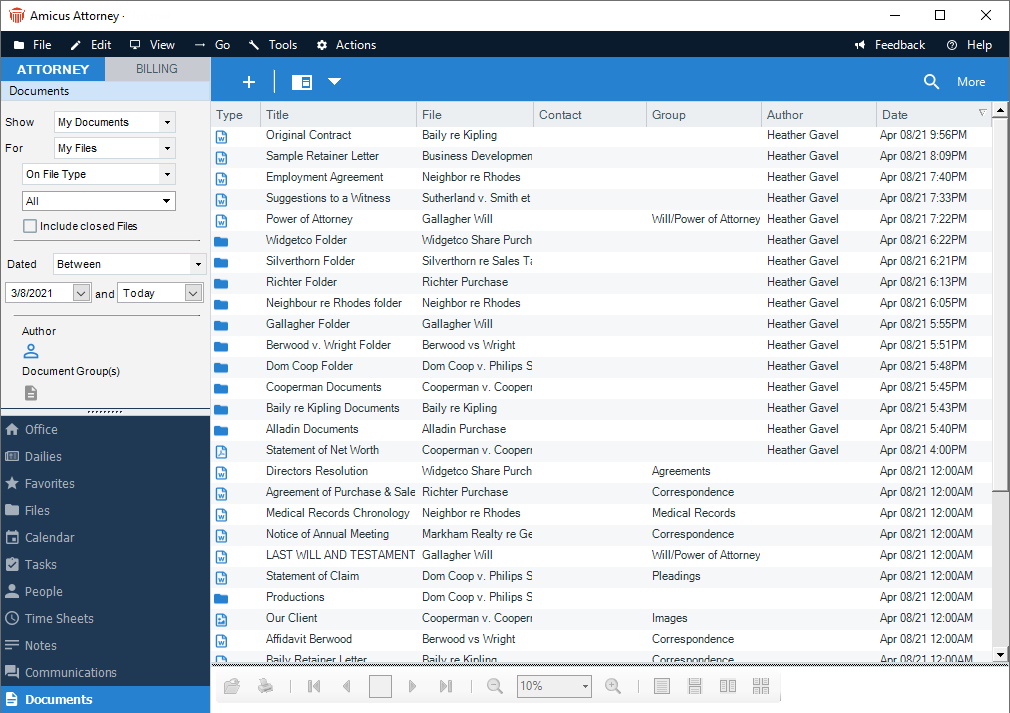
To open the Documents module, click the Documents button in the Navigation Pane. The Documents Index window appears.

What's in the Documents Index
The Document Index shows information such as the Document Title, associated Files and Contacts, assigned Document Groups (if the Document is on a File), Author, and Date. In an Amicus-Managed Documents environment, the list also shows whether a Document is currently checked out: who checked it out and when.
Document Type — This module includes Documents of Type "File"—that is, Documents for which the associated document is a computer file (a Word or WordPerfect document, a spreadsheet, a picture, etc.). If your firm uses the Amicus Indexing Service, the module also includes Documents of Type "Folder"—that is, Documents that reference a computer folder (which could contain many computer files). Documents of Type "Web Page/URL" and "Other" are not included. For more about Document Types, see Completing the Document Details.
Alternatively, to work with the full list of Documents on a particular File or Contact, see Working with a Document list from File or Contact Details.
Filtering the list of Documents
Using options in the control panel, you can filter the list of Documents shown to suit your needs. This is useful if you have a large number of Documents.
-
All/My Documents — By default, only the Documents to which you are explicitly assigned are shown—these are the Documents that appear in the "My Documents" list in File (or Contact) Details. To show all Documents (regardless of whether you are assigned), select the "All" option.
-
Firm Files/Firm Contacts/My Files/My Contacts — By default, only the Documents on Files to which you are assigned are shown. Depending on your assigned Security Profile, a choice between "My" and "Firm" might be available. To show Documents on all Files or all Contacts, select the "Firm Files" or "Firm Contacts" option. To show Documents on your Files or your Contacts only, select the "My Files" or "My Contacts" option.
-
File Type/On The File — If showing Documents on Files, you can filter the list to Files of a particular File Type (e.g. Civil Litigation) or the particular File you select.
-
Closed Files — If showing Documents on Files, only Documents on Open Files are shown by default. You can choose to include Documents on Closed Files.
-
Dated — Optionally, filter the list by Document Date: before, after, or between particular dates.
-
Author — Optionally, filter the list to a particular Document Author.
-
Document Groups — If showing Documents on Files, you can filter the list to Documents assigned to one or more particular Document Groups.
Searching for Documents
You can quickly search for Documents within the Documents module.


-
Choose whether to search the full text of the actual documents linked to the Amicus Document records, or search the Document Title and Summary fields of the Amicus Document records.
-
Choose whether to search all Documents or only within the set of Documents currently listed in the Documents Index.
-
An "all" Documents search checks not only all Documents to which you are directly assigned, but also all Documents on the Files, Contacts, or Events to which you are assigned, regardless of the filter settings in the control panel.
-
-
Enter the text you want to look for. The text is not case sensitive.
-
For a Title/Summary search, enter all or part of a word or phrase. For example, a search on "west" will find both "west" and "western". Punctuation is ignored: for example, a search on "smythe-brown" will find "Smythe-Brown?" and "Smythe Brown".
-
For a full-text search, enter a complete word or phrase. If your firm uses the Amicus Indexing Service, you can enter just part of a word.
-
-
Click the magnifying glass icon. The search results are shown in the list.
-
Next:

-
To search further within the current results, click Refine Search. This clears the initial search text, but keeps the search results. Then enter your additional search text and click the magnifying glass icon.
-
When finished with the results list, or to start a new search, click Clear Search. Or simply reset your filter options in the control panel. This clears both the search results and search text.
-
Details:
-
Full-text searching (formats)—Documents in the following formats can be indexed:
-
Word (.DOCX .DOC, .DOCM, .DOTX, .DOT)
-
Excel (.XLSX, .XLS, .XLSM, .XLSB)
-
PowerPoint (.PPTX, .PPT, .PPTM)*
-
Outlook Mail (.MSG) - under 64-bit Windows only
-
WordPerfect (.WPD)
-
Acrobat (.PDF)
-
Rich Text Format (.RTF)
-
Text (.TXT)
-
Hyper-Text Markup Language (.HTM, .HTML)
-
Extensible Markup Language (.XML)
-
Comma-Separated Values (.CSV) - under 64-bit Windows only
-
* If your firm uses Amicus Indexing, partial-word searching of PowerPoint documents is not supported—e.g. a search on "test" will not find "testing".
-
Full-text searching in a User-Managed Documents environment — Searching is available only on documents that reside in the folders configured for indexing by your Amicus Administrator.
-
Full-text searching in an Amicus-Managed Documents environment — To search prior versions of a document, in addition to the current version, select the "Include Versions" checkbox at the top right. This is relevant to "File" Type Documents assigned to matter Files.

-
Full-text searching of Folder-type Documents — If your firm uses the Amicus Indexing Service, the search results list for a full-text search also includes the items referenced by Folder-type Documents. Amicus lists each of the computer files in which a match was found and you have rights to view. The file's folder path is displayed in place of the Amicus Document Title so you know instantly which file contains the match. To open the file in its native application (e.g. Word), right-click on it choose View Document. Double-clicking the row will open the folder in Windows Explorer.
Preview pane
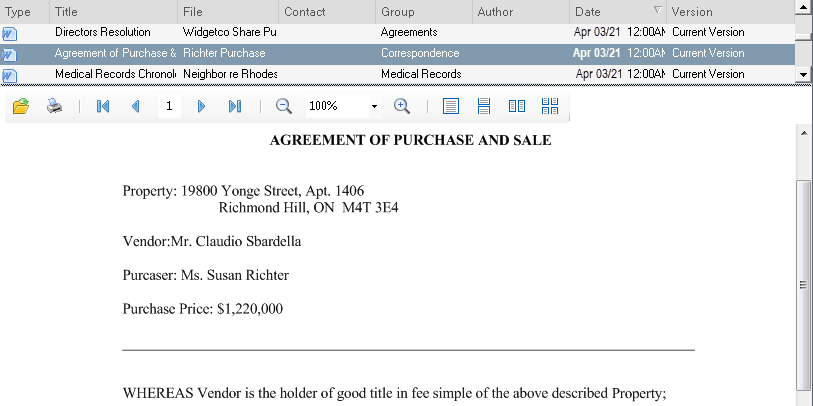
Review your documents quickly and easily. An optional preview pane is available in the Documents Index to display the contents of the currently selected document without the need to open it in its native application.
The following formats are supported in the preview pane: .DOCX, .DOC, .PDF, .BMP, .JPEG, .PNG, .TIFF, .MTIFF.

-
Use the Preview button on the toolbar (or choose Preview from the View menu) to turn the preview pane on or off, or change its location.
-
To increase or decrease the size of the preview pane, drag the divider bar.
-
Use the preview pane toolbar controls to open the document in its native application, print the preview image, navigate pages, or change the zoom.
 |
Note: Word documents, pagination and other formatting in the preview may differ from in Word. Preview is not available for Folder and Dropbox documents. |
Working with Documents
From the Documents Index, you can use menu commands, right-click options, or Amicus Toolbar buttons to perform the following functions:
-
Preview the document contents
-
Open the Document record
-
View (open) the actual document
-
Create a new Document record
-
Check in or check out a document, or cancel a check out (applicable in an Amicus-Managed Documents environment)
-
Create a Time Entry on the Document record
-
Send an e-mail with the selected "File" Type documents as attachments
-
Print the Document record list, or a Document record details, or the actual document
-
Add the Document record to your Favorites list
-
Delete a Document:
-
In a User-Managed Documents environment, only the Amicus Document record is deleted. The actual document or folder remains intact.
-
In an Amicus-Managed Documents environment, both the Amicus Document record and the actual document are deleted.
-
Related Topics
