Time > Time Entries > Using the Time Entry Assistant
 Using the Time Entry Assistant
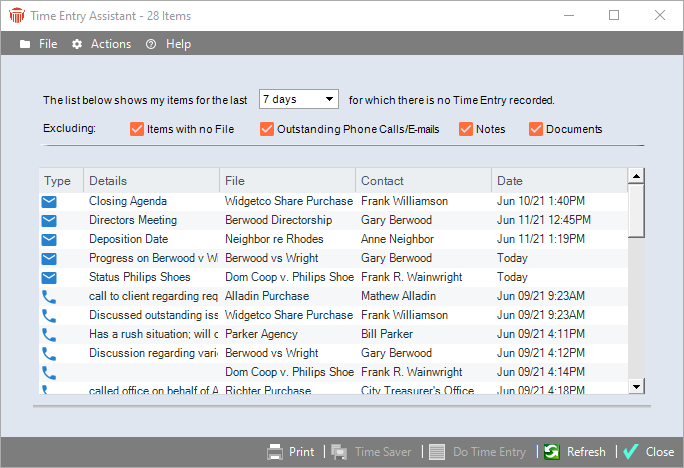
The Time Entry Assistant feature makes it easy to ensure that Time Entries have been created for all relevant items. It quickly locates items for which Time Entries have not yet been recorded: Done To Do's, Appointments, Phone Calls, E-mails, Notes, and Documents.
Several methods are available for creating Time Entries for the items in your list, and for assigning File(s) to items without a File. You may limit the search by date range, and some additional exclusion options are available.
-
The Time Entry Assistant is available from the Tasks Toolbar in the Time module, and from the Tools menu in all modules.

-
Select a Date Range that is suitable for your purposes (items for the last x days).
-
Optionally, narrow your search by excluding items that may not be likely candidates for a Time Entry. You can choose to exclude one or more of the following:
-
Items that are not associated with any File
-
Outstanding Phone Calls and Saved E-mails
-
Notes
-
Documents (This refers to Document records designated as type File.)
-
-
To sort the list, click any of the column headings. To refresh the list, click Refresh. To print the list, click Print.
-
To work with items in the list, select one or more items, right-click, and choose:
-
Time Entry (or click Do a Time Entry) to create and open Time Entry Details for each item.
-
Time Saver (or click Time Saver) to create Time Entries immediately, without opening Time Entry Details—for more information, see Creating a Time Entry based on a record.
-
Open to open the details of the Appointment, To Do, Phone Call, etc.
-
Ignore Item to permanently remove items from the list without creating Time Entries on them. This also hides the "Do a Time Entry" icon for these items in list views throughout Amicus.
-
Add to File to assign items to File(s) immediately, without opening the item details. Select one or more Files in the Files Select dialog that appears and click OK.
-
Print to print items.
-
All Time Entries created will be dated as of the date of the underlying item, and become available for review in the Time Sheets module.
Related Topics
