Calendar > Adding an Appt w/Basic info
 Adding an Appt w/Basic info
Appointments are Events you have to do at a specific time on a specific day. You can add Appointments directly into the left section of the Day view by clicking and dragging the cross-shaped cursor across the desired time period—the Event Details dialog may appear, depending on your Calendar preference.
Or, you can click New on the toolbar in the Calendar module, or choose File > New > Event from the main menu in any window.
 |
Note: You can also create an Appointment on a File or Contact from within Word, by using the Smart Tags feature. For more information, see Performing Amicus tasks from other applications. |

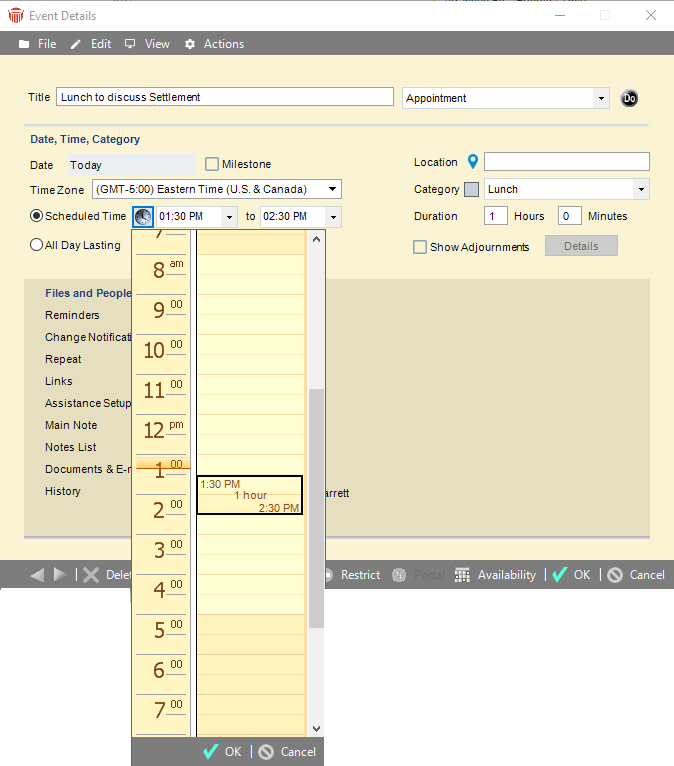
Fill in the details of the Appointment:
-
Name the Appointment by typing a short description in the Title box.
-
If necessary, select "Appointment" in the list box at the top right.
-
Set a date for the Appointment. The Date box is already filled in with the date that was displayed in the Day view you came from.
-
If desired, you can change the Time Zone from the default set in your preferences to the one you select in the list box. Note that changing the time zone does not shift the Appointment block shown in the graphical sections of Calendar views.
-
Set a time or day range for the Appointment.
-
The Scheduled Time option has been selected for you, and the start and end times are filled in as well. The times correspond to the period over which you dragged the cursor in the left section of the Day view. You can edit the times in any of the following ways:
-
Change the times (and duration) by typing new times in the From and To boxes, or select times from the pull-down lists.
-
Change the times and duration by clicking the clock icon (or press <ENTER> at that Tab stop). The Time Scheduler dialog appears.
-
-
Drag the top or bottom of the Appointment box up or down to change the start or end time (and therefore the duration), or drag the entire box up or down to shift its time without changing the duration. When finished, click OK. For ease of use, the following shortcut keys are available:
To do this ... Press this ... Move box up or down UP or DOWN Move the top of the box only, up or down SHIFT+UP or DOWN Scroll up or down in the window CTRL + UP or DOWN Scroll up or down in the window ALT + UP or DOWN -
Change the end time indirectly by changing the duration—type the number of hours and minutes in the Duration boxes
-
Alternatively, you can select the All Day Event option, and then select the number of days the appointment lasts in the associated list box. All Day Events are scheduled for nearly 24 hours (12:00 am to 11:58 pm). In the graphical sections of Calendar views, and in Events lists, the label "ALL DAY" will appear before the Appointment Title.
-
The Title, Date, and Scheduled Time (or All Day Event length) are the necessary details that you have to fill in for every Appointment. If you do not need to provide further details, click OK to schedule the Appointment.
However, you have the option of filling in more details to make the Appointment more specific, and allow Amicus to be much more useful. Some of these details are available in the header section of the Event Details dialog, and some are in the views you can choose on the navigation list at the left.
Other ways of creating Appointments
You can also create Appointments in the following ways:
-
Convert a Note into an Appointment—see Converting a Note to another record
-
Convert a To Do into an Appointment—see Converting a To Do into an Appointment or vice versa
Related Topics